
Integrating oXygen
This tutorial describes how to access BaseX from the oXygen XML Editor.
There are two alternatives for using BaseX in oXygen:
- Resources in BaseX Databases can be browsed, opened and modified via WebDAV.
- XQuery expressions can be run by the query processor of BaseX via the XQJ interface.
Note: BaseX itself is a highly compliant XQuery 4.0 processor. The XQJ interface, which is used to establish the connection between oXygen and BaseX, is specified for XQuery 1.0.
Access Database Resources
Added: Instructions for accessing database resources via WebDAV were re-added.
Preparations
- Download one of the complete BaseX distributions (ZIP, EXE).
- Start the Web Application, e.g. with the
basexhttpstart script (see Startup). - Create a BaseX database, if necessary (see Databases).
Configuration
- In oXygen, go to menu Options → Preferences → Data Sources.
- In the Connections panel (in the lower half of the screen), click the New button (
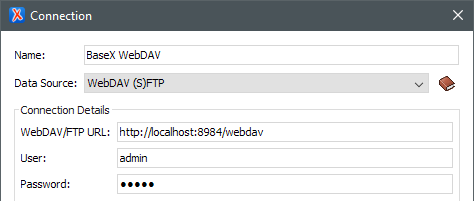
+). - Enter “BaseX WebDAV” as connection name.
- Select one of the WebDAV data sources (e.g. WebDAV (S)FTP) in the Data Source dropdown box.
- Fill in the appropriate connection details as follows:
- Set the WebDAV URL to
http://localhost:8080/webdav. - Set the User to
adminand enter your password.
- Set the WebDAV URL to
- Now press OK, and your Data Source is ready for use.
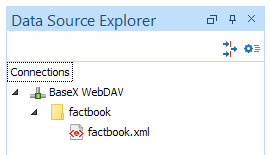
You can then access your databases via the Data Source Explorer: Window → Show View → Data Source Explorer. Databases are listed as top-level folders, and the resources they contain can be opened, edited, copied, moved and deleted.
Notes
- The credentials of a database user are requested, and its permissions decide which operations are allowed. A user with
createpermission is required to add or drop databases. - A resource that is saved directly below
/webdavwill create a new database, named after the file without its suffix. - BaseX supports WebDAV write locks. They can be requested by oXygen via Options → Preferences → Network Connection Settings → HTTP(S)/WebDAV → Lock WebDAV files on open. Locks are kept in main memory and will be discarded when the server is restarted.
- See WebDAV for more details on the service and its conventions.
Perform Queries
One-Time Setup
Preparations
- Download one of the complete BaseX distributions (ZIP, EXE), if necessary. The XQJ libraries are included in its
libdirectory. - Start BaseX (see Startup). Note: Charles Foster’s XQJ implementation provides a default (client/server) and a local driver. If you want to use the first flavor, you need to start a Database Server instance.
Configure Data Source
- In oXygen, select Options → Preferences → Data Sources.
- In the Data Sources panel, add a new data source using the New button (
+). - Enter “BaseX” as name and select XQuery API for Java (XQJ) from the Type dropdown box.
- Add the following JAR files of your distribution with the Add button. The versions of the JAR files may differ:
basex/lib/xqj-api-1.0.jarbasex/lib/xqj2-0.2.0.jarbasex/lib/basex-xqj-13.0.jarbasex/BaseX.jar, if you want to use BaseX embedded
- Under Driver class, choose the preferred driver class:
- Client/server communication:
net.xqj.basex.BaseXXQDataSource - Embedded use (standalone):
net.xqj.basex.local.BaseXXQDataSource
- Client/server communication:
- Click OK.
Configure Connection
- In the Connections section (in the lower half of the Data Sources dialog), click New (
+). - Enter “BaseX XQJ” as name and select “BaseX” as data source.
- If you use the default driver, enter the following values in the Connection Details section:
- port:
1984 - serverName:
localhost - user:
admin - password: your password
- port:
- Click OK to complete the connection configuration.
- Click OK again to close the Preferences dialog.
Configure New Transformation Scenario
- Select Window → Show View → Transformation Scenarios.
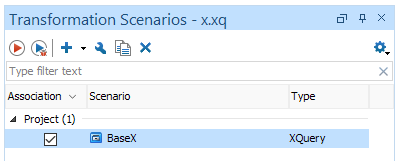
- In the Transformation Scenarios panel, click
+and select XQuery transformation in the lower part of the dropdown list. - Enter a name for your transformation, e.g., “BaseX” like in the screenshot below.
- Specify an optional XML and XQuery URL:
- If you would like to query a database, leave the XML URL field empty and use
db:getin your XQuery URL file. - If you specify an XML document in the XML URL field, you can query its content using
.(dot operator) in your XQuery URL file.
- If you would like to query a database, leave the XML URL field empty and use
- Choose “BaseX XQJ” as Transformer from the combo box.
- Click OK to complete the scenario configuration.
Execute Query
After the one-time setup steps are complete, you can execute your query using the new transformation scenario. Start the transformation by clicking the red Run button (Apply associated scenarios) in the Transformation Scenarios window, while your scenario is selected. The results should be immediately displayed in the result panel.
Changelog
Version 13.0- Added: Instructions for accessing database resources via WebDAV were re-added.